


Fall for this Cranberry, Brie, and Orange Monkey Bread
- Catrina White
- Oct 11, 2020
- 7 min read

Fall is my favorite time of year! I love the cool days, warm sweaters, and crispness that come with it. I dream of family, friends, and good food. I'm pretty much always ready for the next season, but if there was a contest, Fall definitely wins.


A few years ago, I bought a cookbook all about Monkey Breads. Who knew such a thing even existed? My friend also bought it, and I can't remember who got it first. But I know this — she made a Cranberry Brie Bread from it and I cannot even express how delicious it was! And so, of course, I had to make it "my own" as I often do when I'm baking.
I always view recipes as a starting off point. Yes, I do know how to follow directions, but I also know how to think of what would be delicious! My creative side overrides my follow directions side and I'm ready to bake. I hope from this blog you've seen that I don't think you should take yourself too seriously. I don't!
Do your best, and enjoy what you get in return. And if something flops, oh well. Try again. Or try something new.
There are times to follow rules and times to create your own.
I'm hoping that my children will make this recipe one day. I think it is something that might seem too "fancy" at first, but it is a type of Monkey Bread! How fancy can it be? Well....a little maybe.
I think we tend to be scared of things we aren't sure of. Brie. I've tasted it before, but never really made anything with it. What do you do with the white outer part? Do you eat it? I don't know, but seems like I don't want to, so I don't! I probably should have researched that a little more before I began, but sometimes you just need to make a decision and go with it.
So, this Monkey Bread combines many of the things I love: Cranberries, Oranges, Pecans, Butter, Bread, and Brown Sugar. Can you see why it is a winner? I hope you'll try to make it and see what you think. It might become part of your Fall Recipes Collection.
And now....Cranberry, Brie, and Orange Monkey Bread!

I started by getting everything ready. There's nothing worse than getting excited about making something and finding out you don't have a main ingredient. I often make substitutions, but having the main ingredients is important. Luckily, I had everything!
Making the Dough
I like to warm up the bowl I'm going to be making bread dough in. You can easily do this by swishing around some warm water in it and dump it out. Then I placed the 1/3 cup of warm water and the packet of active-dry yeast into the warmed bowl. I also like to add a pinch of sugar to help "feed" the yeast and make sure it will work.


I have sometimes worried that my water would be too warm, or not warm enough. I always thought the warmer, the better, but I'm learning that cooler is fine, too. I usually use warm water (110 degrees or so) for the starting liquid, but when adding more liquid, go with something a little bit cooler. It takes longer to rise, but the flavors that are developed during this extra time are worth it.

After the yeast starts to get foamy, I add 2/3 cup more water, 2 tablespoons of melted butter, 1 cup of flour, and then add the salt on top of that. I try not to add salt directly into my yeast as I read once that it can deactivate it. I need to research that, too! But separating it is easy to do, so I do that. I then added another cup of flour. I made sure to have some ready to sprinkle into my bowl as the dough comes together.


I used my Kitchen Aid to mix it, but of course you could just use your wooden spoon and get your hands in it! Sometimes I prefer to just use my hands, but today I decided the mixer was the way to go. Nothing would be different in how I would make it though, so using a mixer or your hands will work just fine. Don't be concerned if it takes a minute or two to come together!


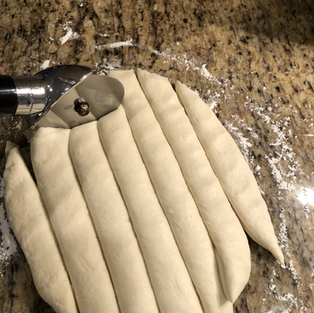
I let the dough knead for about 5 minutes (If I was doing it by hand, I'd probably knead for about 8 minutes), adding a sprinkle of flour every so often to keep it from sticking too much to the sides.
I buttered the bowl I planned to let it rise in, and once it was done kneading, I turned the dough out onto a counter that was lightly sprinkled with flour. I like to touch it, feel how soft it is, and shape it before putting into my bowl. I always put it in upside down, and then flip it over so that the top has a bit of butter covering it. This helps the dough to stay moist and not dry out.


I put it on the counter with a little Saran Wrap over it. I left it there for about 45 minutes, but don't get too caught up in the timing of the rise. You are looking for it to double in size.
Getting Fillings Ready
When the dough looked like it was close to being ready, I decided to get my fillings ready. I measured out my brown sugar, and chopped some pecans using my Pampered Chef Chopper. If you don't have one, you could always use a food processor or knife, but using this is super fun and easy. I also opened up my can of Cranberry Sauce.


I then decided to work on the Brie. Remember earlier when I said I wasn't sure about the white rind? Well, I removed it. I think you should. I may be breaking every Brie rule out there!! But, because I wasn't sure, I just removed it. I sliced it into strips and then cut it into small pieces.


Then I moved onto the orange zest. I think adding a bit of citrus to my baking is delicious. I have two different types of zesters, one that produces long strips of zest, and one that makes a small paste like consistency. If I want just the flavor, I usually add the smaller ground type. If I'm making something like homemade Cranberry Sauce, I'll use the longer strips. Be careful not to go down to the white part of the fruit when zesting as that part is bitter in taste.

While I was looking for my zesters to show you, I came across these measuring spoons! Aren't they funny? I think my mom must have given them to me as I'm always telling her to add a pinch of this or a pinch of that to her cooking. She measures EVERYTHING, so I drive her a little nuts. LOL
Preparing the Monkey Bread
Once the bread was risen and doubled, I sprinkled some flour onto the counter and dumped out my dough. It always feels so soft and good to the touch. I flattened it gently and used my pizza cutter to portion out the amount I was going to roll into balls. I then rolled them and set them aside while I melted the butter.


Putting It All Together
I was ready to begin! Making it is easy but a little messy, too. I rolled each ball of dough in melted butter, then in the nut and brown sugar mixture. I placed a layer of them into an 11x7 baking dish and then sprinkled in half of the cheese, half of the whole cranberry sauce (from a can — but you could use homemade, I'm sure!), and the orange zest.


Then I coated the remaining dough balls and placed them in the pan, adding the rest of the Brie, cranberries, and orange zest. I thought about adding some whole pecans to the bake, but decided not to this time. I might do that next time, though!


I let the bread rise again, for about another 45 minutes. I preheated the oven to 350 degrees, and once the bread had doubled in size, I placed it in the oven. I baked it for about 30 minutes. The cheese was bubbling and ooey-gooey. It smelled delicious! I let it cool for a few minutes and then cut a piece for my husband and one for me.
This bread is not very sweet. You might be surprised! It has a hint of saltiness to it, and a little crunch because of the nuts. I think you could make this easily using frozen rolls, or even refrigerator biscuits. You'd have to adjust the baking time for the biscuits, but just watch it to see when it looks done. You could also use different shaped pans, like a bundt pan. I also dreamed up making the dough in braids, or twists — so many possibilities!
I hope you try this and that you love it. I fell for it, and hope you "Fall" for it, too! Enjoy! If you want to see the original recipe, it is in the Monkey Breads and More cookbook. My adaptation is below.

Cranberry, Brie, and Orange Monkey Bread
1/3 cup warm water
1 package active dry yeast
2/3 cup warm water
2 tablespoons melted butter
1 teaspoon salt
2 1/2 - 3 cups flour
1/3 cup brown sugar
3/4 cups finely chopped pecans
1 Brie Cheese
1 can cranberry sauce (whole berry)
1 orange, zested
1/4 cup melted butter
Dissolve the yeast in 1/3 cup of warm water. Add a pinch of sugar if you'd like to! Once it is foamy, add the remaining 2/3 cup of warm water, melted butter, 1 cup of flour, salt, and remaining 1 - 1 1/2 cups of flour. Mix together using a dough hook if using a Kitchen Aid, or stir together with a wooden spoon if making by hand. Knead the dough until smooth and silky. Place in a buttered bowl and let rise for 45 minutes, checking to be sure it is doubled in size.
Place the brown sugar and nuts into a small bowl and mix together. Melt the butter in a separate bowl. Zest the orange and open the can of cranberries. Cut the Brie into small pieces (I removed the rind).
Once the dough has doubled, remove from the bowl and pat into a flat(ish) disk. Cut into equal sized pieces and roll the dough balls into balls. Butter a dish — I used 11x7 pan — and place balls into butter, then brown sugar and nut mixture. Place 1/2 of the balls in the pan. After making one layer, add 1/2 of the cheese pieces, 1/2 of the cranberry, and 1/2 of the orange zest. Repeat with the remaining dough balls, cheese, cranberry, and orange zest.
Let rise for another 45 minutes, or until doubled in size. Bake at 350 degrees for 30 minutes. Let cool and cut into pieces. Enjoy!


Comentários